


The useful part of a pet tag is a working route to the owner. A beautiful engraving is not enough if a phone cannot read it or the owner misses the message. Use this checklist with your tag maker before producing a batch.
This is a test method, not a report of laboratory results. QRChat has not established a universal minimum tag size, durability rating or scan success rate through this article.
Prepare the real code
Create and activate a code for the pet, with Lost & found as the purpose and Individual as the chat type. Download that code from your account. Use a separate code for each animal; copies for the same animal can share its code.
QRChat offers SVG export profiles for LightBurn and EZCAD. Choose the profile appropriate to your workflow and check the imported geometry and dimensions in your production software. These exports do not determine safe laser power, speed or material settings; those depend on your equipment and material supplier.
In My batches, you can open a previously generated batch and request its downloads again. Keep a record matching each exported code to the intended pet or item. Do not use decorative QR codes from article illustrations on a real tag. Use only the actual code downloaded from your account.
Give the maker a clear layout brief
- Preserve the exact QR pattern and square proportions.
- Keep dark modules against a plain, light background with strong contrast.
- Leave a clear border at least four modules wide on all four sides. A module is one small square of the QR pattern. DENSO WAVE specifies this quiet zone.
- Keep text, logos, mounting holes and decorative borders outside that area.
- Choose a flat, visible position; test any reflective finish rather than assuming it will scan.
- Add a short instruction, such as "Scan to contact my owner", outside the quiet zone.
Choose an attachment suitable for the animal and its collar or harness. Have a professional advise on fit when needed. QRChat provides the digital service; the physical tag and its suitability remain part of your production choices.
Test the finished sample
Test the actual printed or engraved sample, not only the image on a computer screen. Use two different phones if available, including one that is not signed into the owner's QRChat account.
- Record the tag dimensions, QR area, quiet-zone width, material and finish.
- Try the ordinary camera app in daylight and indoor light, facing the tag and at an angle.
- For each attempt, record the phone model, conditions, approximate distance, whether a link appeared and whether it opened the intended code.
- Repeat after attaching the tag: curvature, reflections and neighbouring hardware can change the result.
- If a scan fails, adjust size, contrast, border or placement and test again before making more copies.
Do not publish a success percentage without stating how many attempts were made and under which conditions. A successful sample is useful evidence for that setup, not a guarantee for every phone or future wear condition.
Complete the conversation test
Send a test message from the second phone, reply as the owner and check the notification channel you enabled. Try a shared location and confirm that the owner can open the point in Google Maps. Location sharing is optional; a written landmark or pasted map link also works.
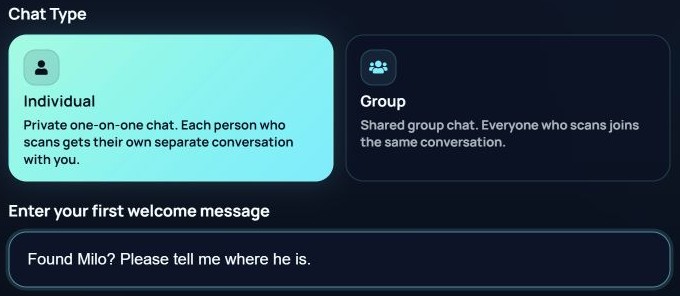
This screenshot shows the actual creation form in English. Use the interface language you prefer and write a welcome message that helps a finder identify the pet without revealing private details.
Inspect and replace
Check for loose attachments, scratches, dirt and loss of contrast. Rescan periodically and after any repair. Reprint the same active code for a replacement tag. If you create a different code, replace all old copies you no longer want used.
Continue with the pet setup guide or compare QR tags, microchips and GPS.